Test Your Knowledge
If at any point you want to test your tab-reading skills, just click the button below to take the quiz and test yourself!
The Essential Guide To Reading Fingerstyle Banjo Tab
Below is a video and text tutorial (and quiz!) on how to interpret banjo tabs (the banjo-specific system of musical notation), including the conventions I personally use to convey certain techniques.
Though I’m a big proponent of learning to play by ear, and start folks off on this path early on in the Breakthrough Banjo course, I also think tab is an extremely useful tool for communication, and as such a very useful teaching tool.
Additionally, all the tabs on this site are rated according to the “Brainjo Level System” to indicate the technical skills required to play them and their overall level of complexity. For more about the level system, go here.
Reading the Tabs Video
Reading the Tabs
Each line of the tab corresponds to a string of the banjo, starting with the top line, which corresponds to the 1st string. The line on the bottom thus corresponds to the short 5th string. The letters on the left hand side (GDGBD in this case) indicate what note the corresponding string is tuned to.
For illustrative purposes, this is how it looks superimposed on a 5-string banjo:
The note to be played is indicated by placing on number on the string, which indicates the fret that should be held down when the note is played. A “0” indicates that the string should be played open (i.e. – unfretted). In the following example, the 3rd string is to be played open, followed by the 1st string at the 2nd fret:
In order to convey certain aspects of the fingering for these tunes, I’ve used a few conventions throughout:
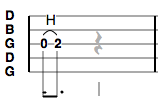
1. Fretting hand notes. Sometimes notes are generated by the fingers of the fretting hand – i.e. hammer-ons and pull-off. When these are performed on a string that’s just been struck by the picking hand, then the technique is indicated by either the letter “H” for hammer-on, or “P” for pull-off.
(from the open 3rd string to the 3rd string, 2nd fret)
(from the 3rd string, 2nd fret to the open 3rd string)
2. Slides. Slides are denoted as a line with the abbreviation “Sl” next to it that adjoins the starting fret to the ending fret. In the example below, a slide is to be played by starting at the 3rd string, 2nd fret and sliding to the 3rd string, 4th fret:
3. Picking hand fingering. The 3 finger tabs are intended to be played with the thumb, index, and middle fingers.
When deciding which finger of the picking hand to use to pluck a given string, the following default fingerings are intended:
- The 5th, 4th strings, and 3rd strings are always to be played by the thumb.
- The 1st string is to be played by the middle finger.
- The 2nd string is to be played by the index finger.
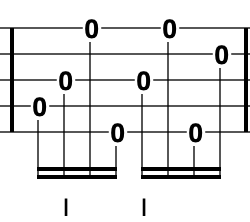
- When there are deviations from these conventions, the suggested plucking finger will be indicated underneath the tab (“T” for thumb, “I” for index, “M” for middle)
In the example below, there are two instances where the 3rd string is to be played by the index finger (rather than the thumb, which is the default). As such, you’ll see the letter “I” appear below the note, indicating it is to be played by the index finger.


